
What is Dataverse?
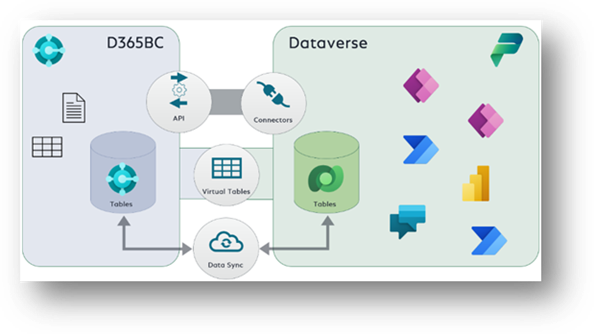
So, the Answer is simple that the Database of Power Platform is known as Dataverse. To connect Business Central with Dataverse we are going to use the PowerApps and Pages in this document we will see that the data created in the Business Central will also show in the Dataverse.
An Image below explains a lot what we are going to do.
Types of Integration
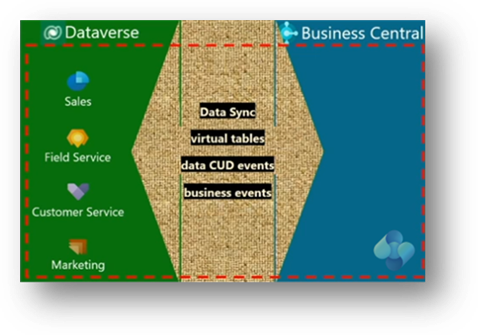
- Data Sync
Data is copied and synchronized between both systems.
Example: A customer created in Business Central is automatically synchronized to Dataverse.
- Virtual Tables
Data is not copied. Instead, it is displayed live from the source system.
Example: A customer record from Business Central can be viewed directly in Power Apps without storing a copy in Dataverse.
- Data CUD Events (Create, Update, Delete)
Notifications are triggered whenever a record is created, updated, or deleted.
Example: When a new customer is created, a Power Automate flow can automatically start.
- Business Events
Notifications are triggered when a specific business action occurs.
Example: When a Sales Order is posted, an email can be sent automatically, or a Power Automate workflow can be triggered.
Connectivity Options
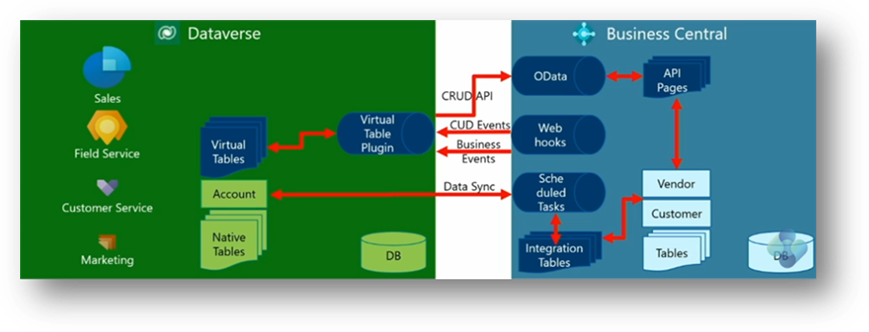
- Data Sync that replicates data changes (CUD) between overlapping tables in Business Central and Dataverse
- C -> Create
- U -> Update
- D -> Delete
- Virtual Tables that enable inbound interactions from Dataverse into Business Central via CRUD API w/o duplicating data.
- C -> Create
- R -> Read
- U -> Update
- D -> Delete
- Data (CUD) Events that enable outbound interactions from Business Central into Dataverse, where they can start power Automate flows using the “When a row is added. modified, or deleted” trigger. (Power Automate Point)
- Business Events that enable outbound interactions from Business Central into Dataverse, where they can start Power Automate flows using the “When an action is performed” trigger (Power Automate Point)
D365BC Dataverse Connectivity
Search Assisted Setup in D365BC and then search Dataverse in the top and then Select “Set up a Connection to Dataverse”.
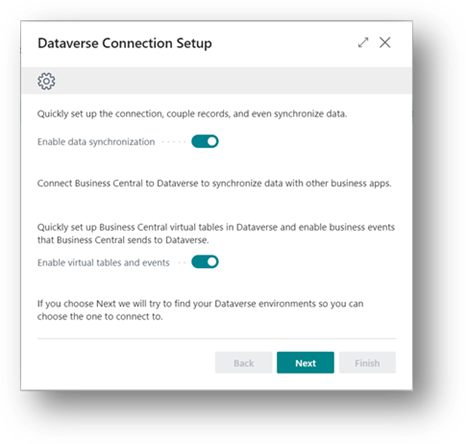
Click on that and it will ask for the 2 things and by default they are enabled so we are not going to change any thing, just click on Next.
- Enable Data Synchronization – Connect Business Central to Dataverse to Synchronize data with other Business Apps.
- Enable Virtual Tables & Events – We can bring the Business Central tables in Dataverse, and its nature is going to be Virtual.
Confusing Right? Let me explain what Standard and Virtual Tables is.
In Power Apps (Dataverse), table types behave differently when you connect them with Microsoft Dynamics 365 Business Central, mainly depending on whether data is stored inside Dataverse or accessed externally.
- A Standard Dataverse table stores data inside Dataverse. When connecting with Business Central, you usually need to sync data using Power Automate, virtual tables (limited scenarios), or custom integrations. For example, if you copy Business Central “Customers” into a Dataverse “Customers” table, that data becomes independent and may require sync to stay updated.
- A Virtual table is the most important for Business Central connectivity. It allows real-time access to Business Central data without storing it in Dataverse. For example, a virtual “Items” table can show live product data from Business Central, so any change in BC (price, stock, description) is immediately reflected in Power Apps.
Will Cover both Connectivity’s
If you Choose Next, we will try to find your Dataverse Environment so you can choose the one to connect us.
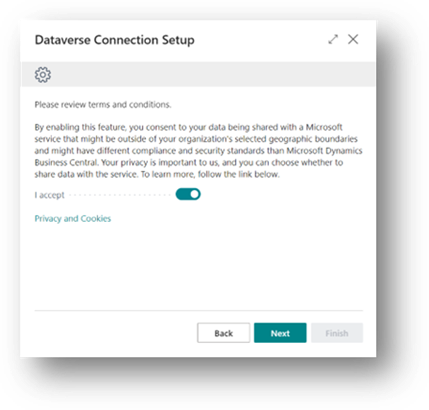
Accept the Terms & Conditions.
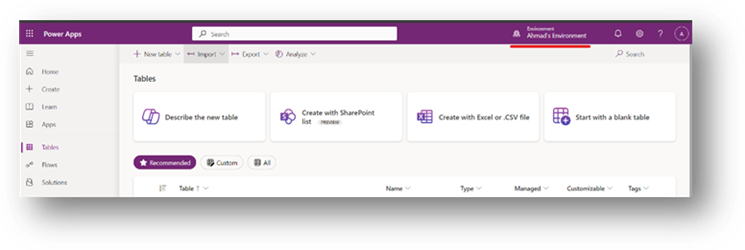
Now if you go to the Power Apps then you can see the Environment Name. Which is Ahmad’s Environment.
Back to Business Central.
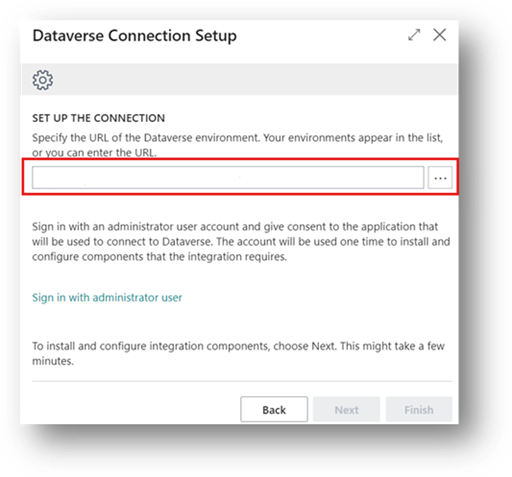
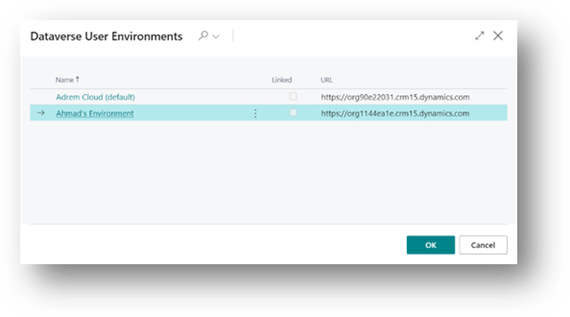
Click on 3 Dots and now select the environment from which you want to connect. Which is Ahmad’s Environment.
After that there is an option of SET UP THE CONNECTION and in that field, you will automatically see a link. Below that there is an option of SIGN IN WITH ADMINISTRATOR USER. Click on that and you will see the page in which add the credentials and then complete the Sign-In Process.
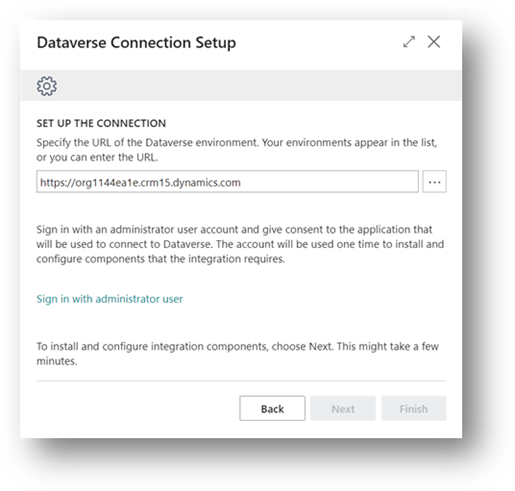
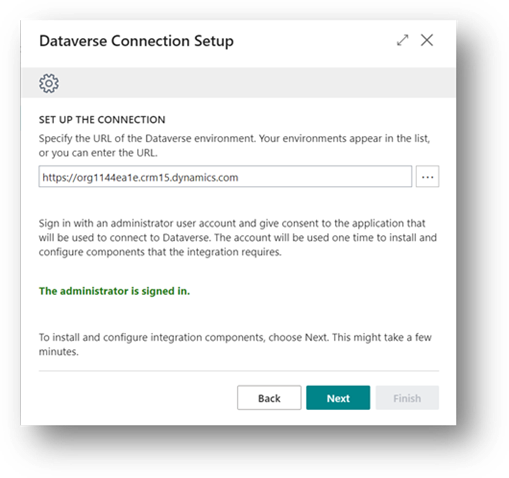
The Administrator is Signed In. Click on Next.
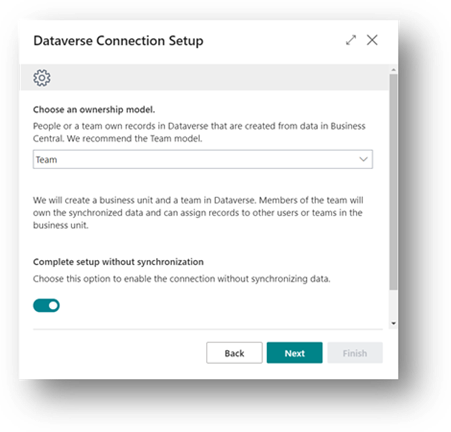
Furthermore, there are 2 options.
- Team Model – There are 2 Options Team and Person.
- Complete Setup without Synchronization – Choose this Option to enable the connection without synchronizing Data.
Choose an Ownership Model:
- People or a team own records in Dataverse that are created from data in Business Central. We recommend the Team model.
- Team – We will create a business unit and a team in Dataverse_ Members of the team will own the synchronized data and can assign records to other users or teams in the business unit.
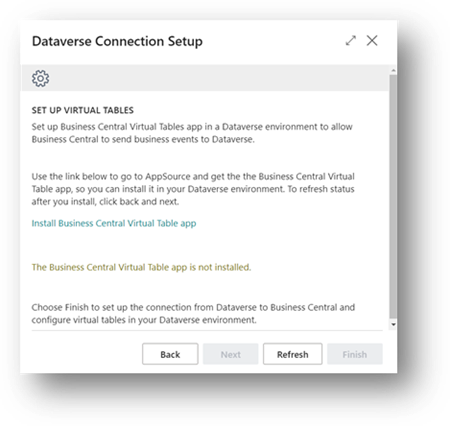
The Next Step is the Installation of the Business Central Virtual Table App. The quick method is to click on this and it will take you to App Source.
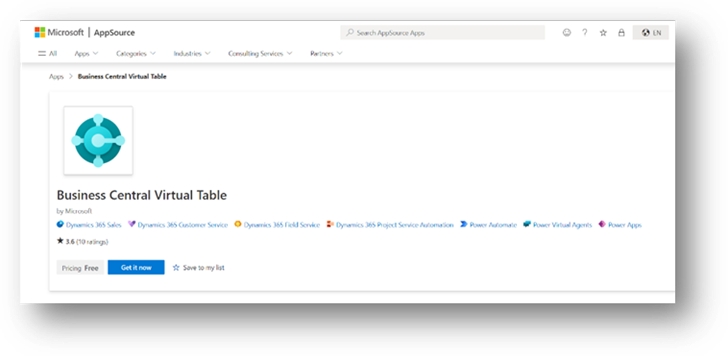
You can get this app Free from Microsoft App Source.
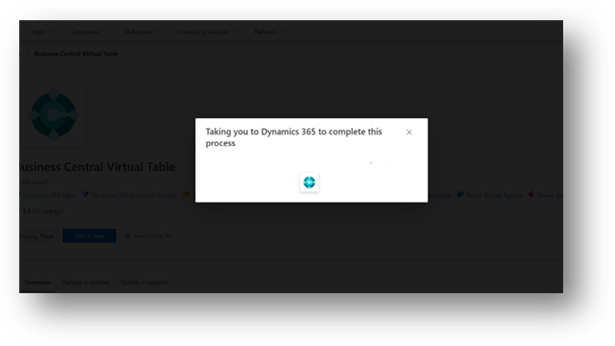
It will take you to Dynamics 365 to Complete this Process.
To Install this, you must agree on 2 Things.
- I agree to Microsoft Legal Terms and Privacy Statement.
- I agree to Privacy Statement and Legal Terms for Reporting Packages into Dynamics 365.
And after that click on Install.
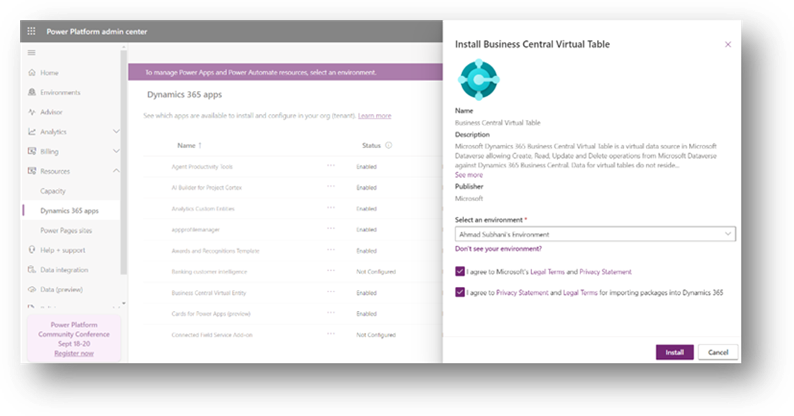
It will take around 5 Mins to Install this App.
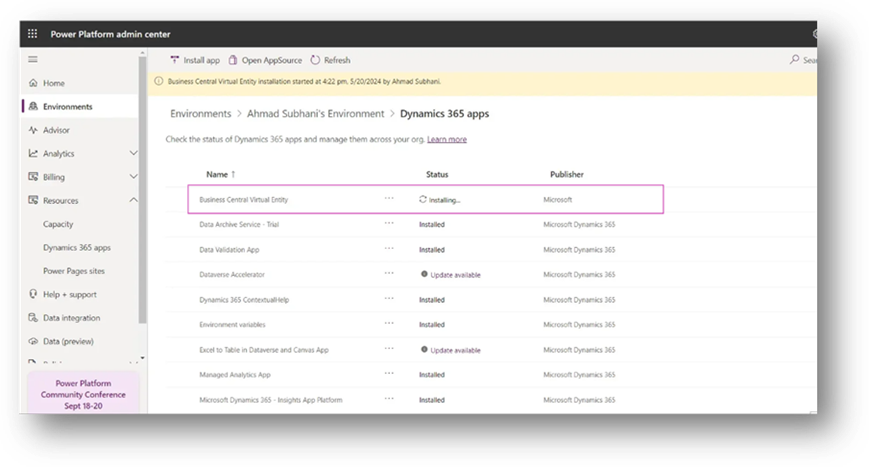
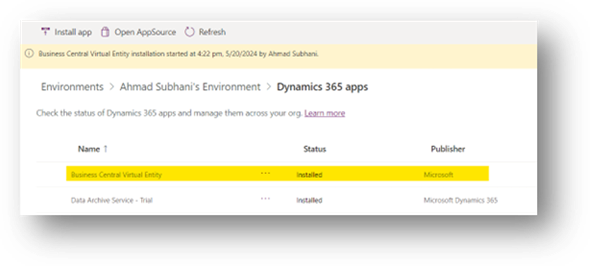
Now you can see the status that it is Installed.
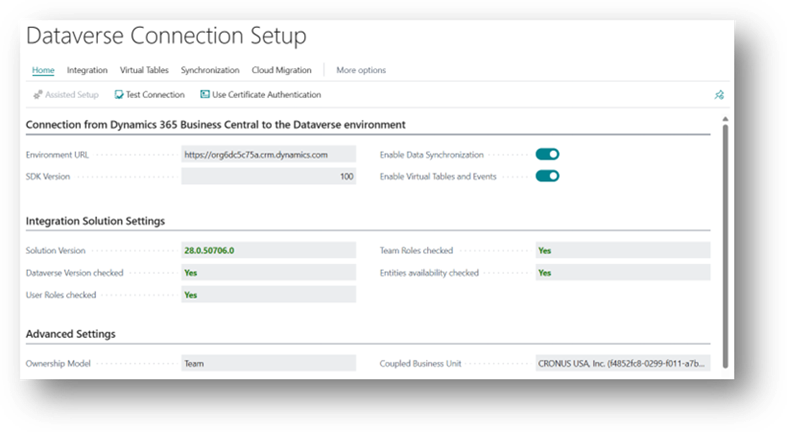
Now you must jump to the Dataverse Connection Setup, and you can see that all the details like URL and other details which were not present here before having now come here after the connection is successfully completed.
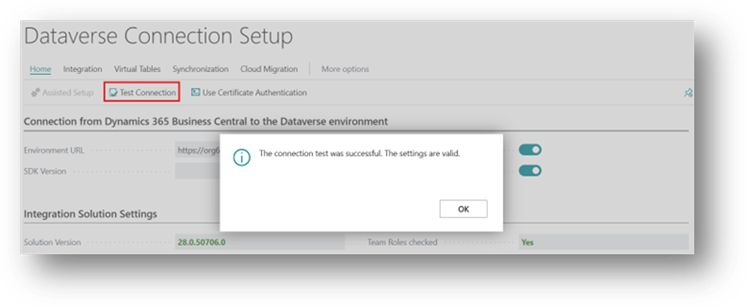
You can Check or Test the connection by Using the Option of the Test Connection in Home Action Tab.
Action Bar Details
There are 5 Things to Discuss Regarding this setup.
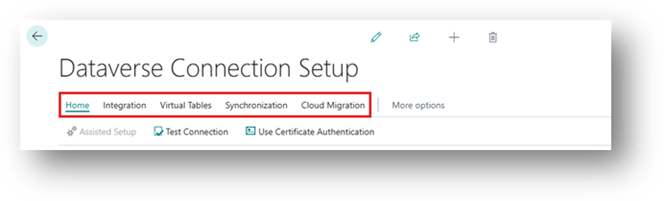
- Home
- Integration
- Virtual Tables
- Synchronization
- Cloud Migration
Let’s discuss that One-by-One.
Home
The list of Options available in-Home Action Button.
- Assisted Setup → Step-by-step wizard to easily configure Dataverse connection.
- Test Connection → Verifies that Business Central is successfully connected to Dataverse.
- Certificate Authentication → Secure login method using a certificate instead of user password.
Integration
The list of Options available in-Integration Action Button.
- Couple Salespeople → Linking Business Central salesperson records with Dataverse users.
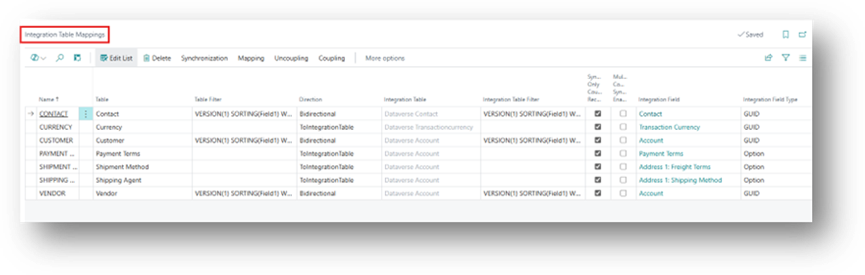
- Integration Table Mappings → From here you can see the list of tables that are default available in Power Apps Tables and in Business Central. Microsoft Integrate them Automatically and you cannot add new columns here because it shows default common tables only.
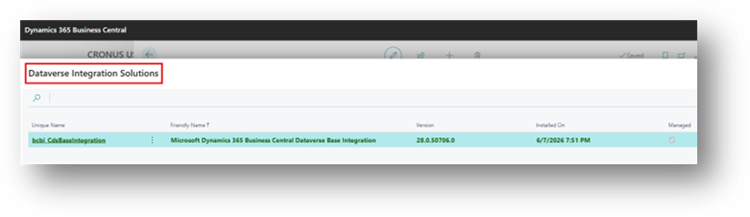
- Integration Solutions → It will only show the Integration that it is Connected.
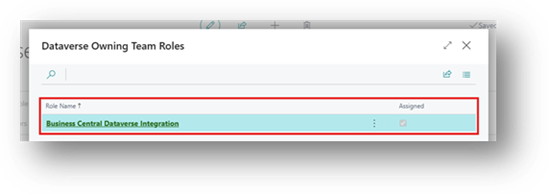
- Owning Team Roles → Dataverse Owning Team Roles mean the permissions assigned to a team that owns records in Dataverse.
- Dataverse Owning Team → Dataverse Owning Team is a team that owns records instead of a single user.
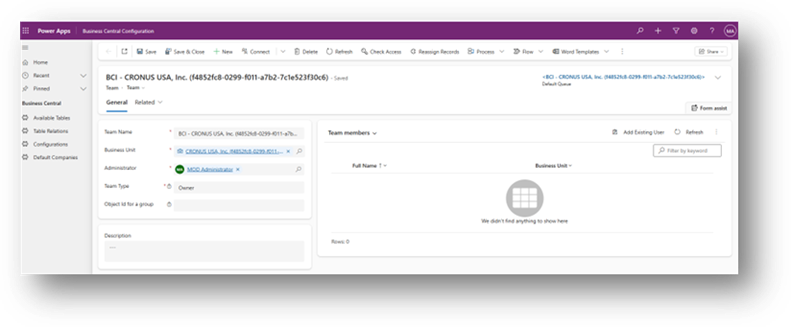
- Add Coupled Users to Team → Adding users (linked from Business Central or Dataverse) into a Dataverse team.
- Redeploy Integration Solution → Reinstall or refresh the Dataverse–Business Central integration package.
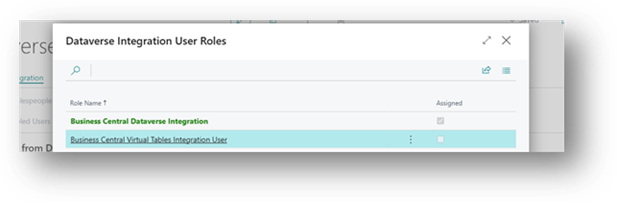
- Integration User Roles → Dataverse Integration User Roles are roles given to a special integration user used for system-to-system connection.
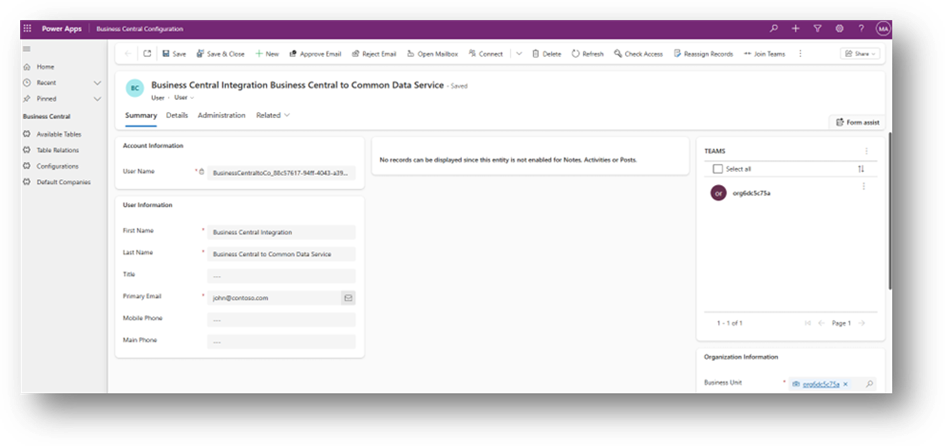
- This user is not a real person
- It is used for automatic data sync (e.g., Business Central ↔ Dataverse)
- Roles define what data this integration user can access or update .
- Dataverse Integration User → Dataverse Integration User is a system user account used for connecting Business Central with Dataverse.
Virtual Tables
List of Points are:
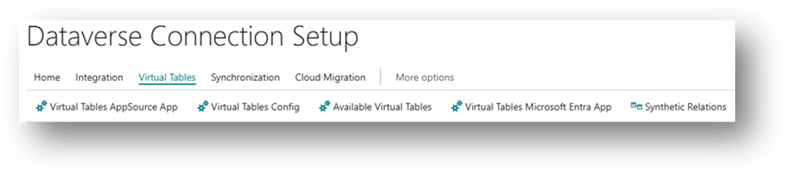
- Virtual Tables AppSource App – The AppSource Apps section is used to install and manage the Business Central Virtual Table solution required for Dataverse integration.
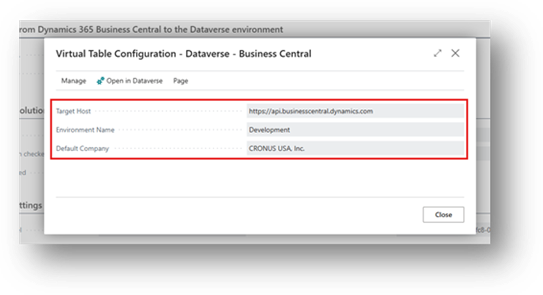
- Virtual Tables Config – Business Central and Dataverse are connected from which Environment and Company, you can check that from here.
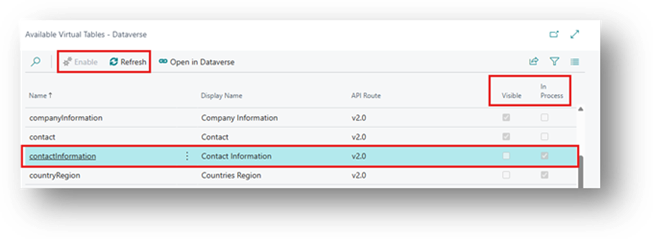
- Available Virtual Tables – You can see the list of Tables that are available to connect with Dataverse. If you click on enable, then it will enable the boolean in Inprocess and Refresh it then if it’s done then it will enable the boolean in Visible.
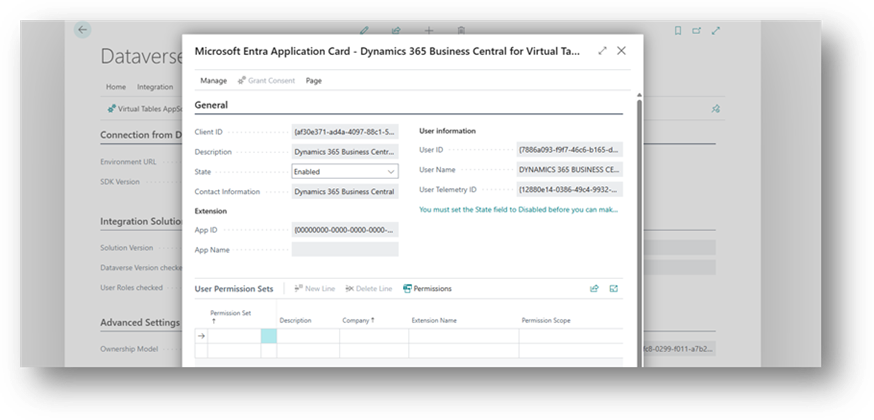
- Virtual Tables Microsoft Entra App – Microsoft Entra Application Card – Dynamics 365 Business Central for Virtual Tables is the registered application in Microsoft Entra ID that Dataverse uses to securely connect to Microsoft Dynamics 365 Business Central Virtual Tables.
In simple terms, it acts as a trusted identity between Dataverse and Business Central.
What does it do?
- Authenticates the connection between Dataverse and Business Central.
- Verifies that requests are coming from an authorized application.
- Allows Virtual Tables to read Business Central data securely.
- Manages Permissions and Access Tokens.
Why is it Needed?
When Power Apps or Dataverse requests data from Business Central, Microsoft Entra ID checks this application registration and issues a security token. Business Central then trusts the request and returns the data.
Example
Power Apps = Employee requesting information
Business Central = Secure warehouse
Microsoft Entra Application = Security badge
Without the security badge, the employee cannot enter the warehouse. Similarly, without the Entra Application, Dataverse cannot access Business Central Virtual Tables.
In Dataverse Connection Setup when you see Microsoft Entra Application Card – D365BC for Virtual Tables it usually shows:
- Application (Client) ID
- Tenant Information
- Authentication Status
- Permissions granted for the Virtual Table integration
Its primary purpose is security and authentication, not data storage or configuration of the tables themselves.
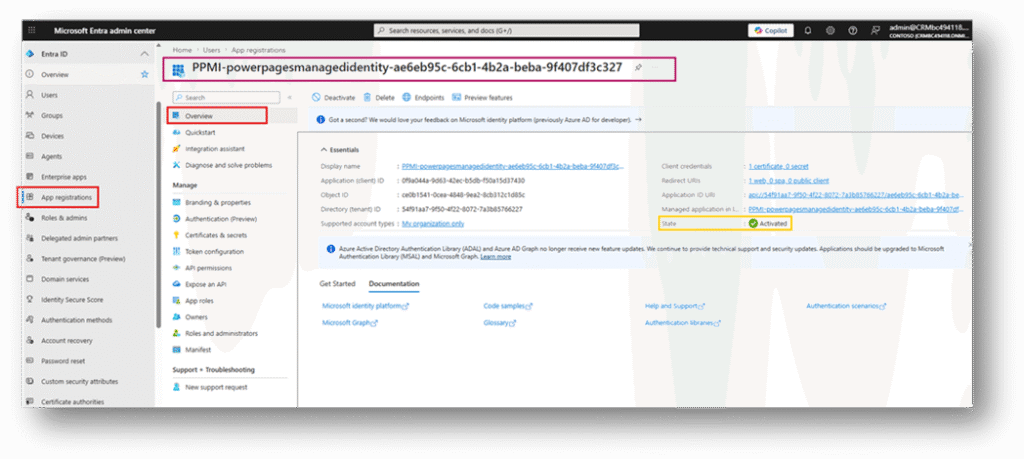
Just for Info Purpose, you can check this from Microsoft Entra:
App Registration > Overview
Synchronization
List of Points that are available are under:
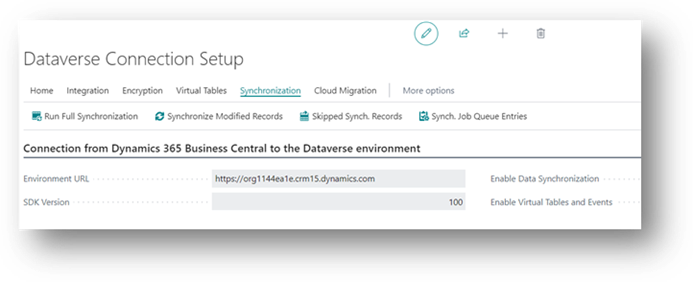
- Run Full Synchronization → All data is synced from start (complete sync).
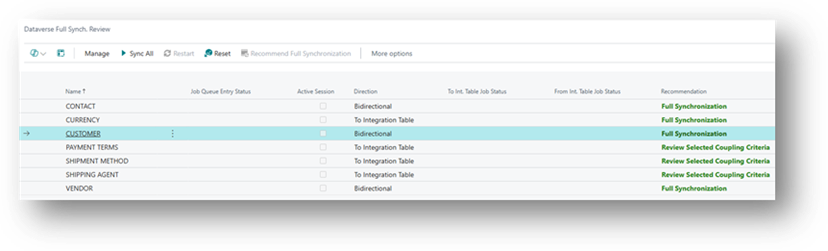
- Synchronization Modified Records → Only updated/changed records are synced.
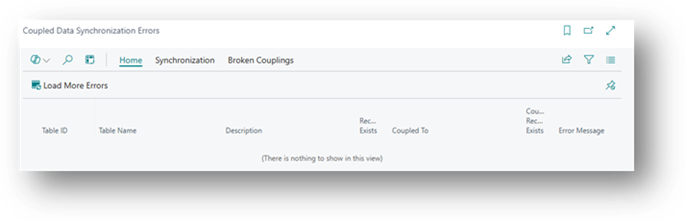
- Skipped Synch. Records → Shows records that were not synced due to errors or conflicts.
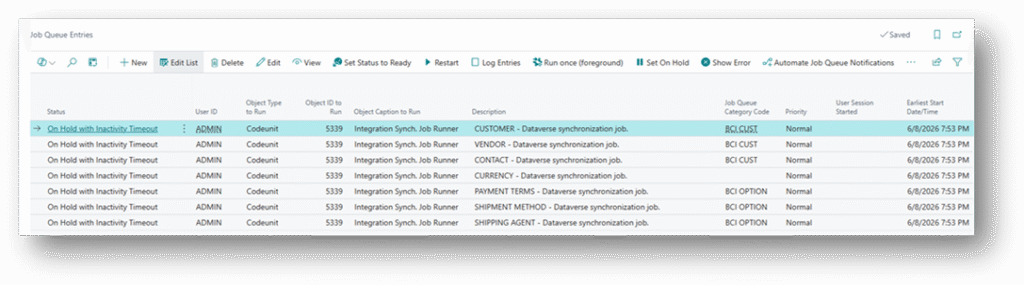
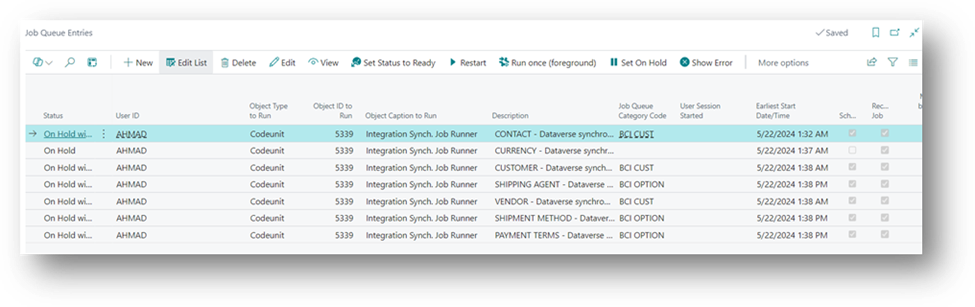
- Synch. Job Queue Entries → Background jobs that control and run the sync process.
Cloud Migration
Cloud Migration means moving your data, applications, and systems from local servers (on-premises) to cloud platforms like Microsoft Azure.
Old system → Cloud system
Example:
Business Central installed on local server → moved to Microsoft cloud
Why it is done:
- Easy access from anywhere
- Better security and backup
- Less hardware maintenance
- Scalable and faster system
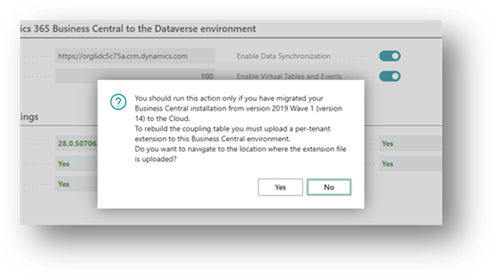
Rebuild Coupling Table → Is used after migrating old Business Central (v14) to cloud to restore broken links between BC and Dataverse records. It requires uploading a per-tenant extension to rebuild those connections.
Integrations and Coupling Records
Now which Field in Business Central is Map to which Field in Power Apps. You can see the Integrated Table Mapping. This option is Available in Integration > Integration Table Mapping.
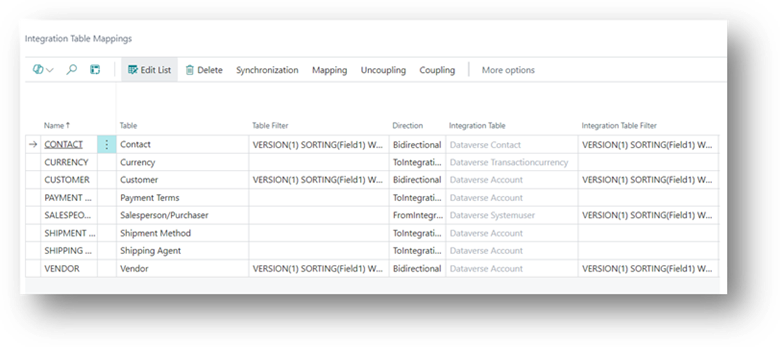
There are Few Fields that needs a bit Explanation.
Name: Specifies the name of the integration table mapping entry.
Table: Specifies the name of the Business Central table to map to the integration table.
Direction: Specifies the synchronization direction. There are 3 types present in it. Bidirectional, ToIntegration Table, FromIntegration Table.
- Bidirectional: Involving, Moving, or Taking place in usually Two Opposite Directions.
- ToIntegration Table: To the Business Central Table.
- FromIntegration Table: To the Power Apps Table.
Integration Table: Specifies the name of the integration table to map to the Business Central table.
Synch. Only Coupled Records: Specifies if the synchronization engine will process only currently coupled records or couple the newly created records as well.
Multi-Company Synchronization Enabled: Specifies if the multi-company synchronization is enabled for this mapping.
Coupling on Customer Card
To see the detail of Coupling on Customer Card. There is an Action Tab name as Synchronizeand there are 4 options present in that.
Set Up Coupling:
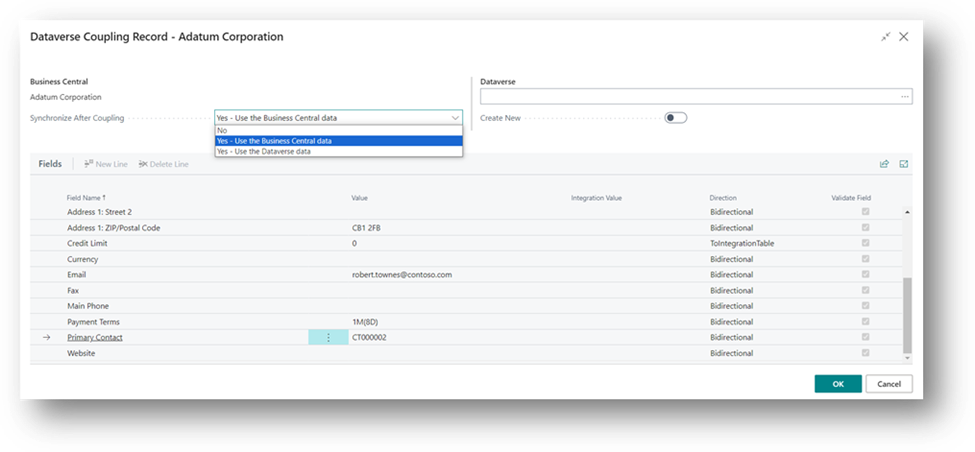
Synchronize: Send or get updated data to or from Dataverse.
Account: Open the coupled Dataverse Account.
Synchronization Log: View Integration Synchronization Jobs for Customer Table.
To synchronize it with Power Apps, click on the Synchronize and then come to the Dataverse Connection Setup and click on Run Full Synchronization.
There is another option name as Synch. Job Queue Entries. After that you can see this Job Queue Entries.
Power Apps & Pages
First, we need to decide the table type for the integration.
- Standard (Dataverse Table)
- Virtual Tables
First go to the Power Apps Page.
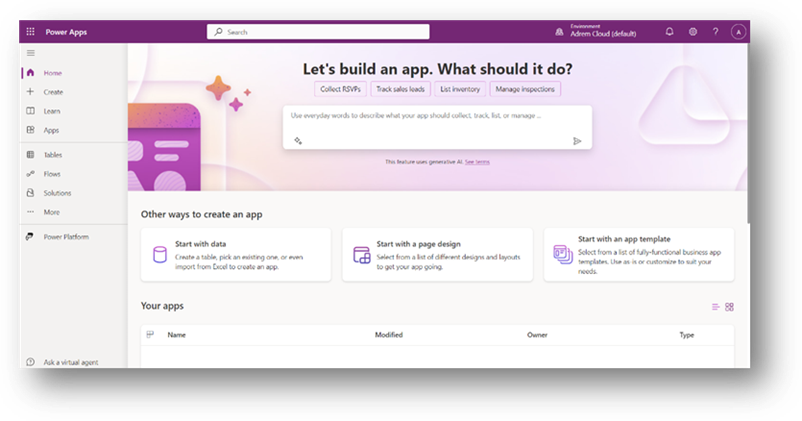
Now we are going to create a Table in the Dataverse (Power Apps). To do that go to the Tables > New Table > Add Columns and Data.
New window will open.
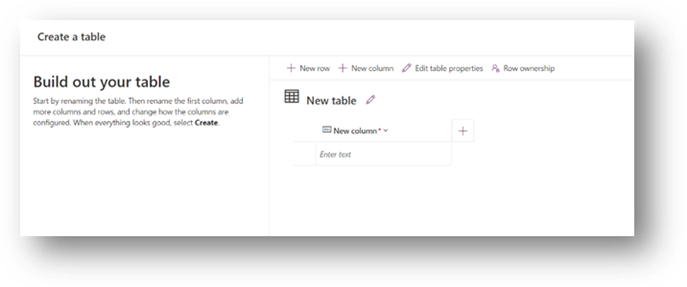
After that “Rename the New Table” and then in the columns we are going to create new columns and the columns are going to be Blank.
Few things to note over here is that I have selected 5 fields from Customer Card and name them as a Column and there is no data in that. And I have changed the Table name to “Customer DRS Table”.
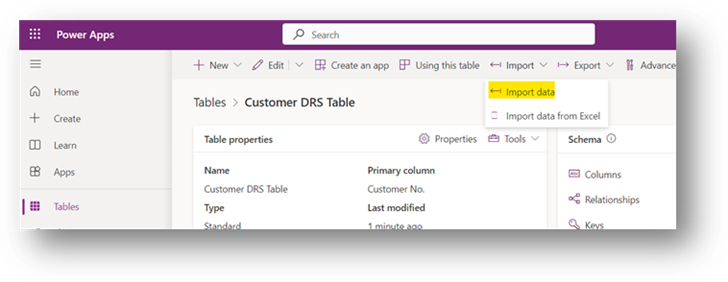
Once this is all done then we need to connect (Business Central and Dataverse)
Go to the Import Data option and click on that.
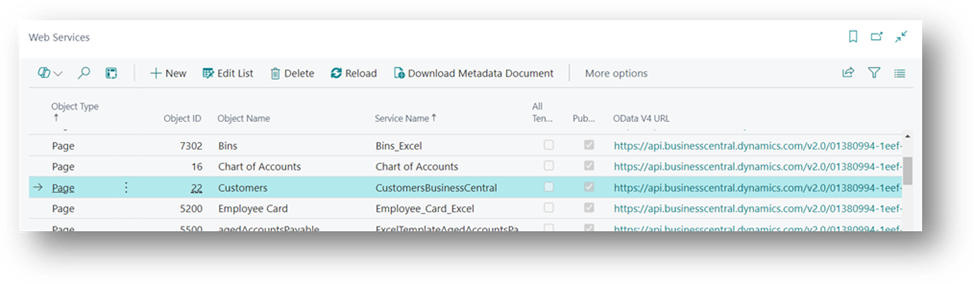
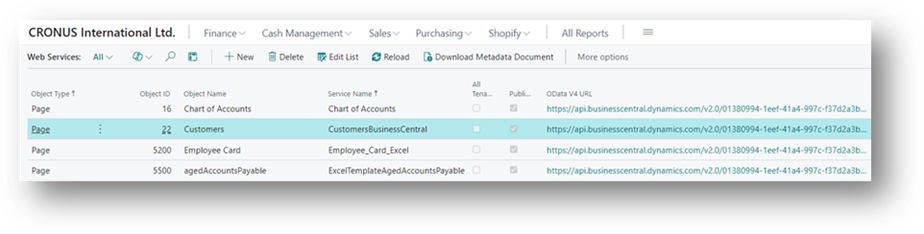
Now we are going to jump to the Business Central and if there is no Web Services created in the system then you can also create a New one. For this Example, we are going to use the Customer Web Services which is available in the system. So, we are going to select that.
- Object Type: Specifies the Type of the object.
- Object ID: Specifies the ID of the object.
- Object Name: Specifies the name of the object that will be exposed to the web service.
- Service Name: Specifies the name of the service.
- All Tenants: Specifies that the service is available to all tenants.
- Published: Specifies that the web service is published. A published web service is available on the Business Central Server computer that you were connected to when you published. The web service is available across all Business Central Server instances running on the server computer.
- OData V4 URL: Specifies the URL that is generated for the web service. You can test the web service immediately by choosing the link in the field.
Now jump to the Power Apps again and there are many methods to Import the Data from other Software or System. But in this case, we are going to use the OData.
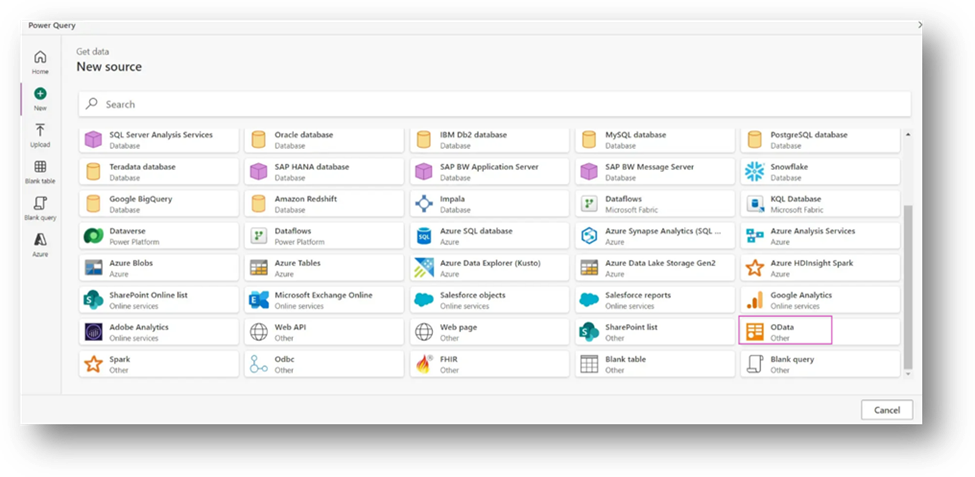
After clicking on that there are few parameters needs to fill.
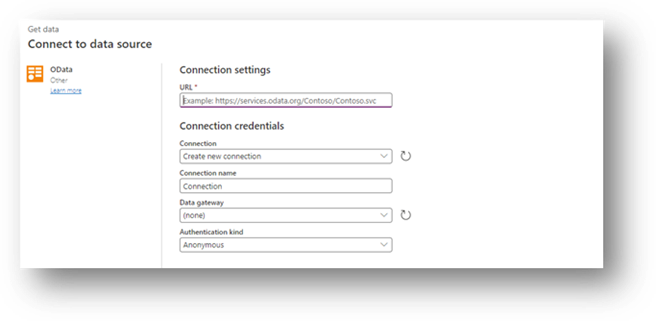
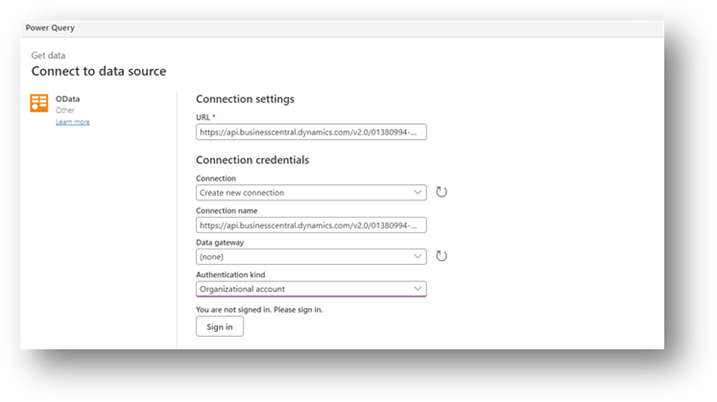
- URL: The URL which is generated in the Web Services.
- Connection: Create a New Connections.
- Connection Name: Select a Connection Name.
- Data Gateway: It will normally equal to None.
- Authentication Kind: There are 2 methods for Authentications. Anonymous and Organizational Sign In. The best way is to do the Sign-In and use your Credentials.
Everything is filled then Just click on the Next.
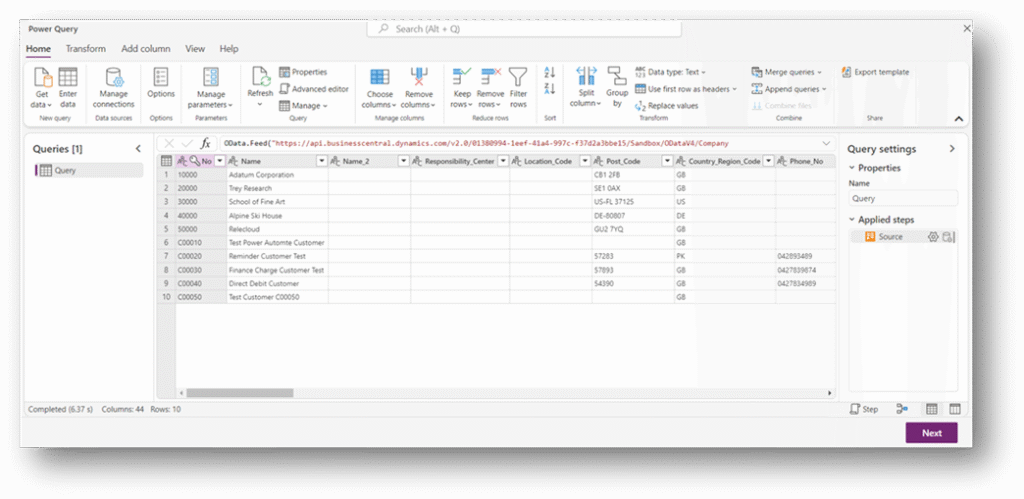
After that in Power Query, the table will open. As you can see in the below screenshot the list of Customers can be seen.
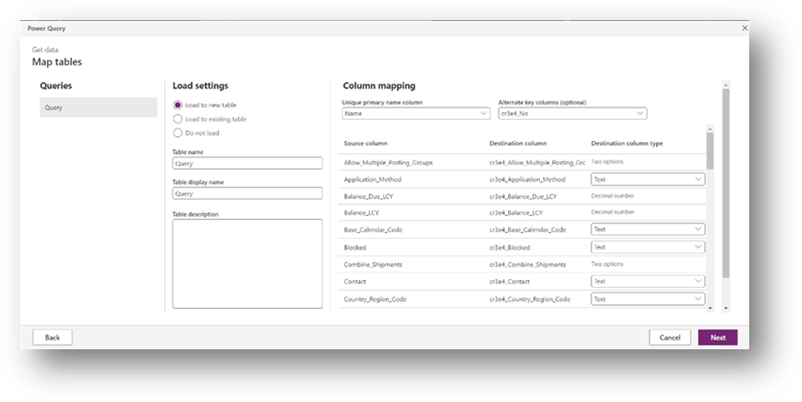
Now in the Map Tables there are 3 options between which we needs to work on.
Load to New Table: When you need to connect with a New Table.
Load to Existing Table: When you need to connect with a Existing Table. In our example we are going to use this one. We have already created a Table in Power Apps named as “Customer DRS Table”.
Do Not Load: Third option is if we do not want to load the Table.
When we selected the Existing Table Option then a lot of Fields is changed.
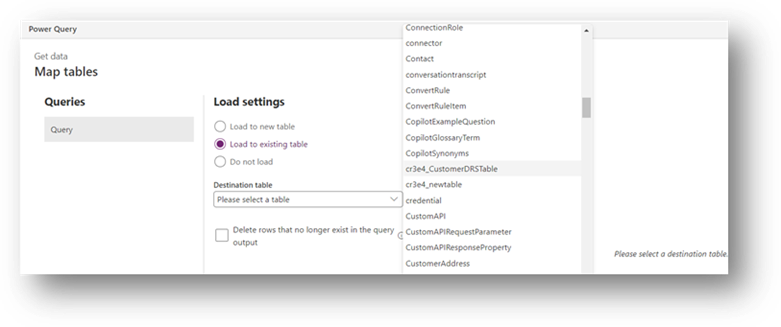
Destination Table – In our case it is “Customer DRS Table”.
And then on the right side there is an option of Column Mapping. We have created 5 Columns in the Table and then we did the mapping for that.
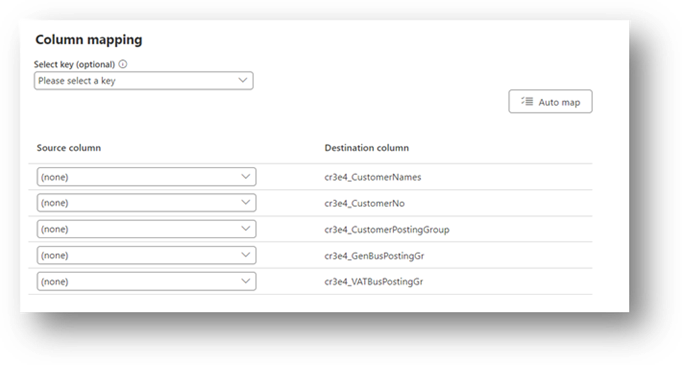
- Customer No.
- Customer Name
- Customer Posting Group
- General Business Posting Group
- VAT Business Posting Group
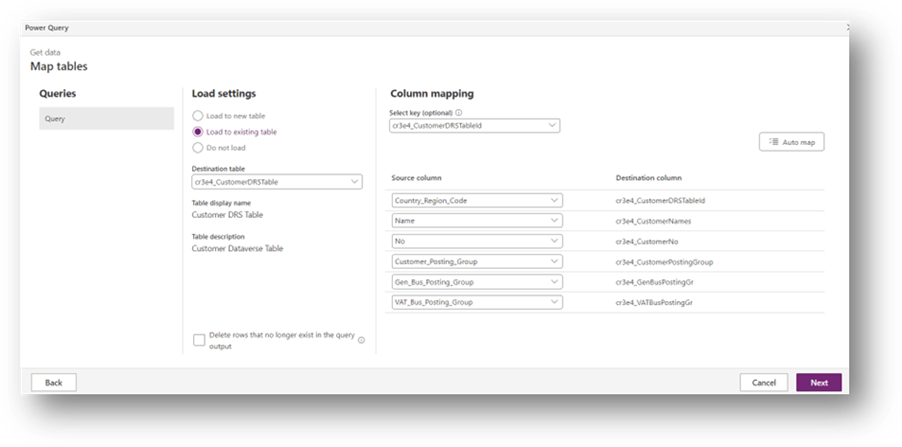
Then click on Next and then Select the Refresh Method – “Refresh Automatically” and the enter the Frequently-Based Refresh.
Refresh Every – After what time the data will reload. For this Example I selected 30 Minutes.
Start At – Date when the refresh is going to start.
Time – Time when the refresh is going to start.
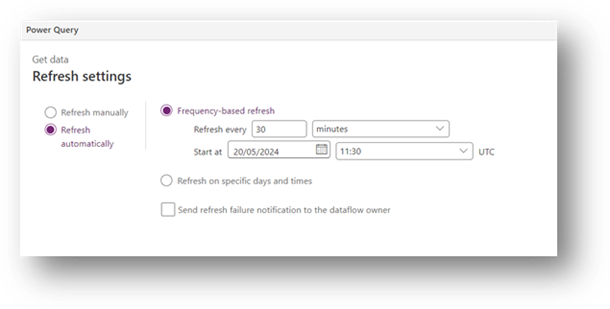
After that just click on Ok and all the process is done. Now what we need to do is to go to the Assisted Setup in Business Central and connect to Dataverse from Business Central End. It’s simple to do it using the Assisted Setup.
Hope so this Article is very Helpful for you.
Thanks for Reading
Ahmad Subhani
D365 Business Central – Functional Consultant
MB-800 Microsoft Certified