
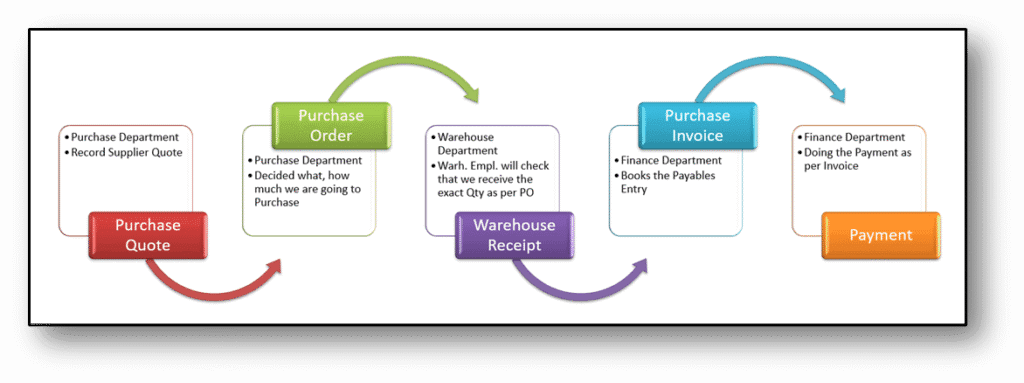
Understanding the Process – Through Departmental Roles
To truly understand the Procure to Pay (P2P) process, it’s important to first understand what each department contributes at every stage. P2P is not just a purchasing activity — it’s a collaborative workflow that connects procurement, warehouse, and finance teams from the Initial Purchase request to the Final Vendor Payment.
1. Procurement Department — The Starting Point
The P2P journey begins with the Procurement (or Purchase) department. Their main responsibility is to manage supplier communication and ensure that goods or services are purchased under the right terms.
In Business Central, the process typically starts with a Purchase Quote. This document helps the team record supplier offers and negotiate pricing. Once the best supplier is chosen, the quote is converted into a Purchase Order (PO) — the formal confirmation of the purchase.
2. Warehouse / Store Department — Receiving and Recording
Once a Purchase Order has been issued, the Warehouse or Store Department comes into action. They are responsible for receiving and verifying the goods when delivered by the vendor.
In Business Central, the warehouse team posts a Purchase Receipt once the items are physically received and inspected. This step ensures that the company’s inventory levels and item ledgers are automatically updated.
3. Finance Department — Invoicing and Payment
After goods are received, the process moves to the Finance (Accounts Payable) team.
When the vendor sends an invoice, Finance posts it against the existing Purchase Order in Business Central. This creates a Posted Purchase Invoice linking the PO, Receipt, and Invoice in a three-way match for full accuracy.
Finally, Finance processes payments through Payment Journals. Payments can be made by bank transfer, cheque, or other methods, depending on company policy.
4. The Connection — Why Each Role Matters
Each department performs a unique role, but their actions are interconnected. If one stage is delayed or inaccurate, for example, an unposted receipt or missing PO approval, the next stage cannot proceed smoothly.
Business Central helps enforce this discipline by linking documents and creating an audit trail for every transaction:
- Procurement initiates and controls commitments.
- Warehouse confirms delivery and updates inventory.
- Finance finalizes costs and clears vendor payments.
This collaboration ensures that the company has a controlled, transparent, and traceable purchasing process from end to end.
Now, we will configure all this scenario in Business Central. Below is the list of Points we need to run in the System.
How to Create a Vendor in Business Central
In Business Central, vendors play a key role in the purchasing process because they supply the products and services that your business buys. This guide explains how to create a new vendor record in Business Central.
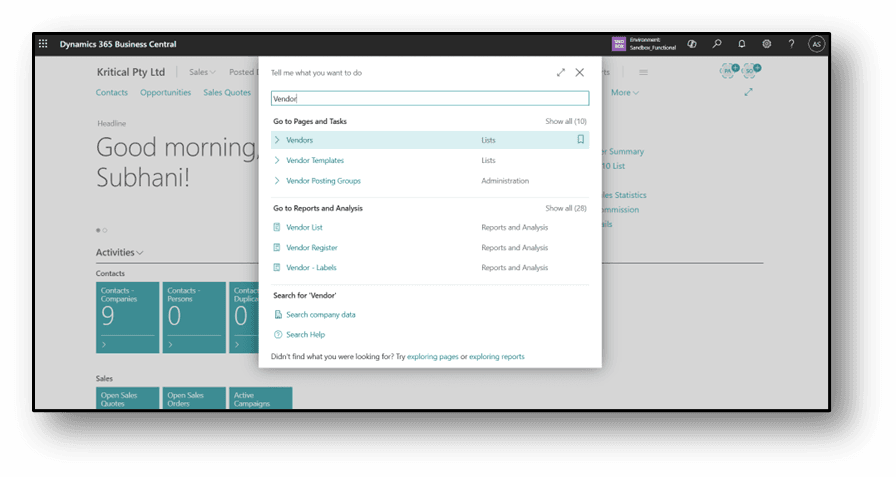
Step 1: Open the Vendors List
- In the Search field write “Vendor.”
- From the Search Results, select the Vendors link to open the list of existing vendors.
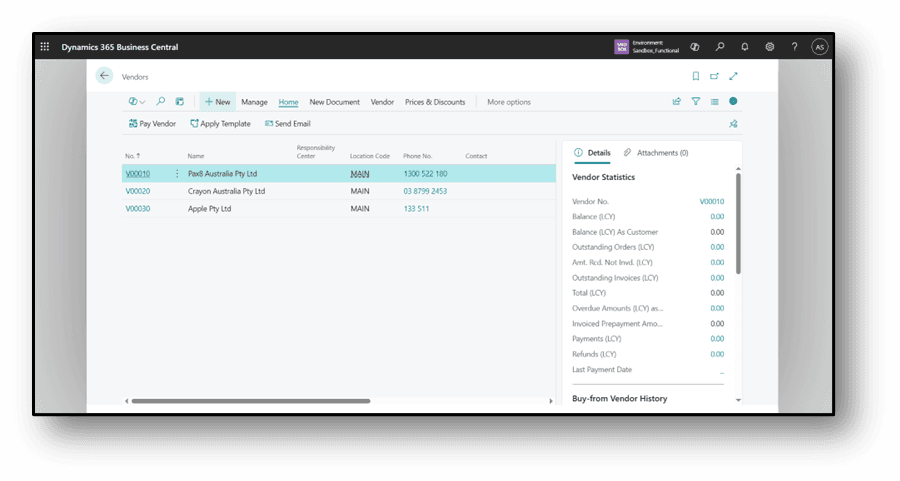
Step 2: Create a New Vendor
- In the Vendors list, click New to create a new vendor record.
- If vendor templates are available, list of templates will appear.
- Select a template that matches the type of vendor you want to create.
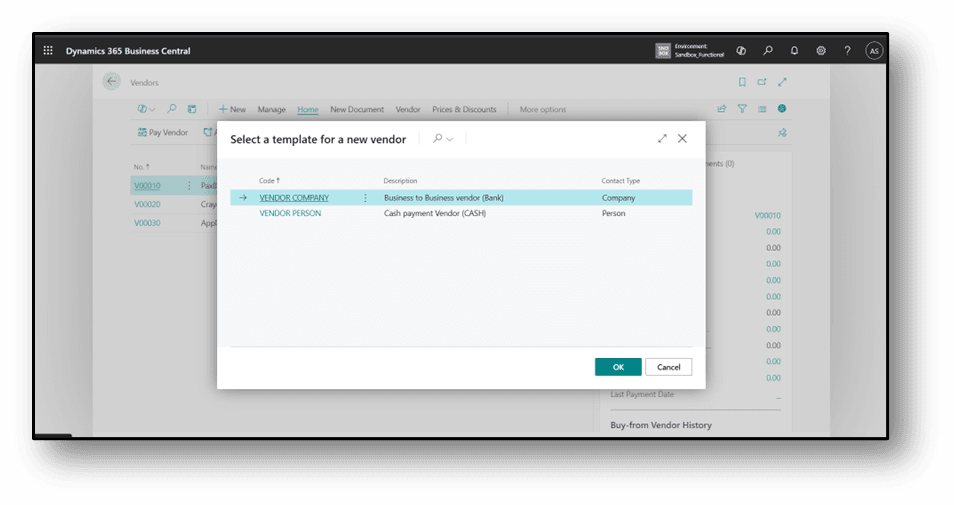
Vendor templates automatically fill in standard details like payment terms, posting groups, and currency, helping you save time, reduce errors, and keep vendor records consistent.
Step 3: Fill in Vendor Details
When creating a new vendor, the Vendor No. field will automatically generate a number based on your company’s number series setup.
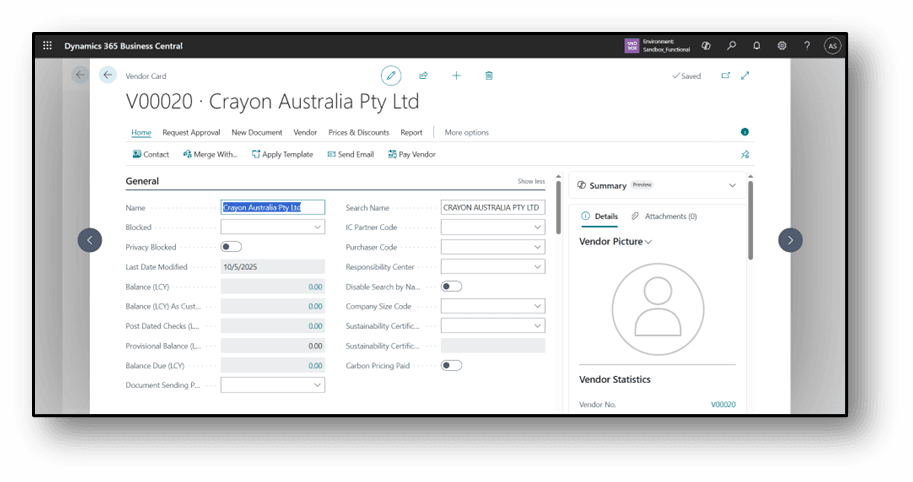
General Tab
- Vendor No. – Automatically assigned based on number series.
- Name – Enter the vendor’s name.
- Purchase Code – (Optional) Enter if applicable.
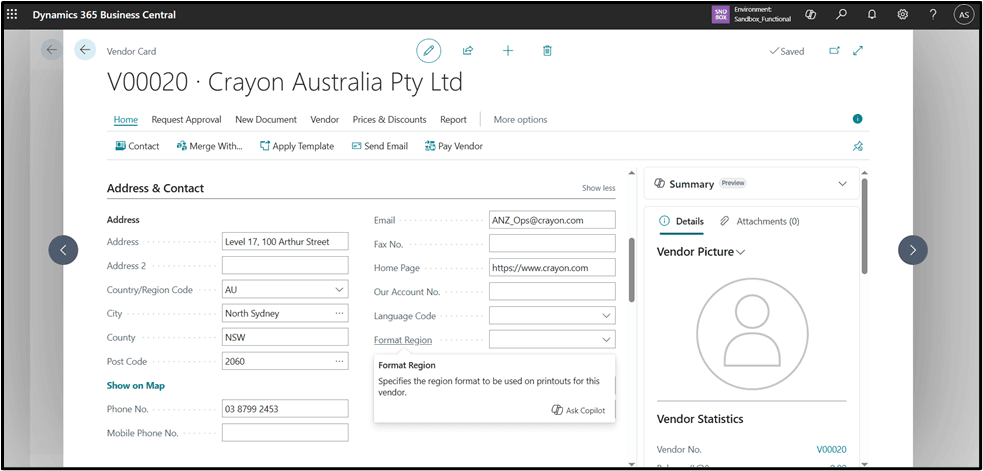
Address & Contact Tab
Enter the vendor’s address and contact details:
- Address, City, and ZIP Code
- Phone Number, Email Address, etc.
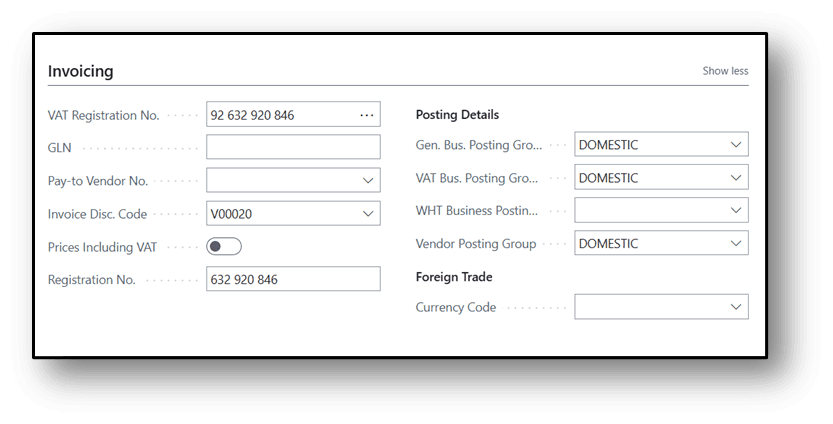
Invoicing
- The Invoicing tab contains the vendor’s tax information.
- It also shows whether the vendor is Tax Liable.
- Under Posting Details, you can define posting groups to control how transactions are posted to the General Ledger.
- The Vendor Posting Group works like vendor classes — it defines the payables posting account.
- The General Business Posting Group specifies the G/L account used for purchases.
- If the vendor uses a different currency, select it from the Currency Code drop-down list to set it as the default currency for transactions.
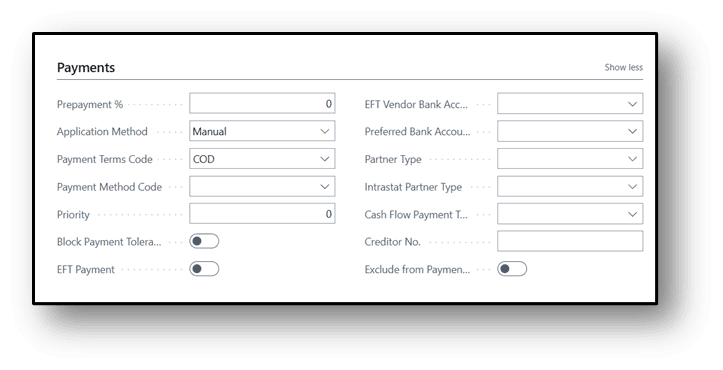
Payments
- The Payments tab contains details about how the vendor is paid.
- You can enter a Prepayment Percentage if the vendor requires advance payment.
- Specify how payments are made to invoices (for example, automatically or manually).
- Set the Payment Terms — this determines when payment is due and is an important part of managing cash flow.
- Choose the Payment Method Code to define how payments will be made (e.g., bank transfer, cheque, cash).
Purchase to Payment Process Flow in Business Central
Now we will process the complete purchase cycle.
How to Create a Purchase Quote
A purchase quote can be used as a preliminary draft for a purchase order, which can then be converted to a purchase invoice.
- Click the search button or Alt+Q on the application bar, enter Purchase Quotes, and then choose the related link.
 2. On the Purchase quote page, click New to create a new quote.

- The quote number will be auto generated based on number sequence.
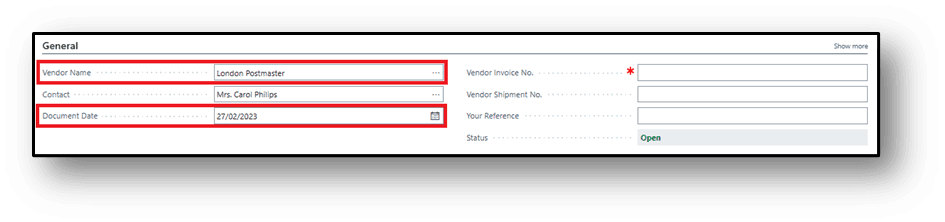
- In the Vendor Name field, enter a vendor.
- In the Document Date field, enter the date of quotation received from vendor.
- The remaining maximum information will be auto calculated or will be fetched from vendor master data. Please review and change them as per your needs.
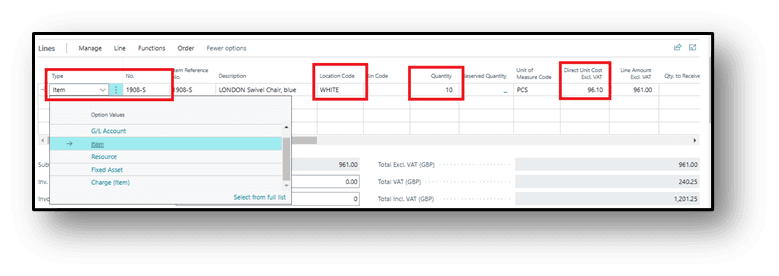
- Select the line type as an Item, GL Account, Fixed Asset or Charge (item).
- Select the required information into the No. filed.
- Enter the Location where to receive the items at the time of receiving.
- Enter the Quantity and UOM
- Enter the Direct Unit Cost.
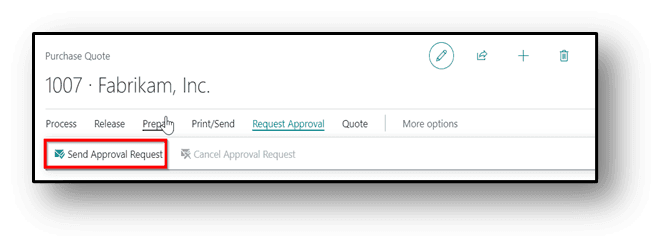
- Go to the Request Approval.
- Click on the Send Approval Request.
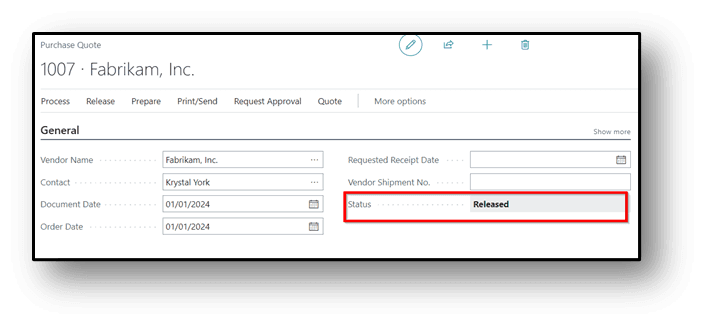
- After the approval process from the Approver (if applicable), please ensure that quote is in the release state.
- On the Header click on Print/Send action from where choose the required option to print or send purchase quote directly to vendor via email.
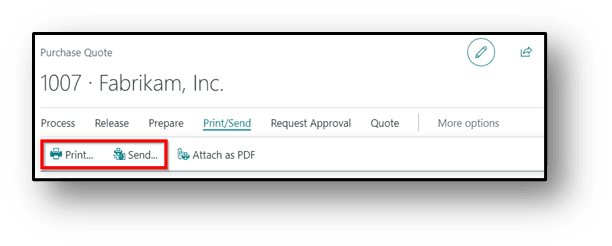
- After getting confirmation from the vendor, purchase quote can be converted into the Purchase order.
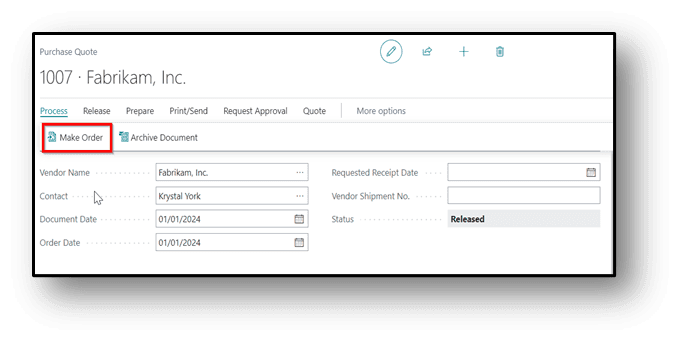
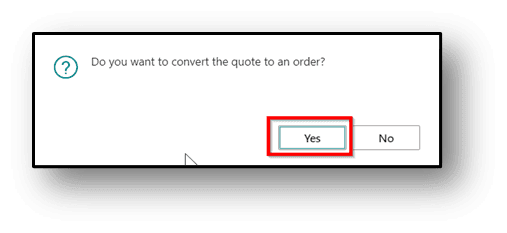
- After clicking on the order, system will ask for the final confirmation before converting into the purchase order. Then, click on Yes.
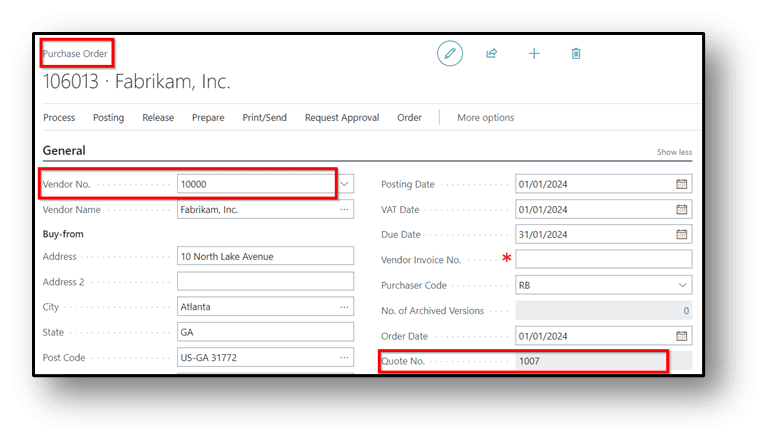
- A purchase order will be created & all the vendor & Item information will flow from the quotation along with quote No. for tracking purposes & then follow the same steps which are referred to under the purchase order & Purchase Invoice process.
How to Create a Purchase Order
With purchase orders, cost of purchases can be recorded and track the accounts payable. Purchase orders are also used to dynamically update inventory levels so that you can minimize your inventory costs and provide better customer service.
- Click the search button or Alt+Q on the application bar, enter Purchase Orders, and then choose the related link.
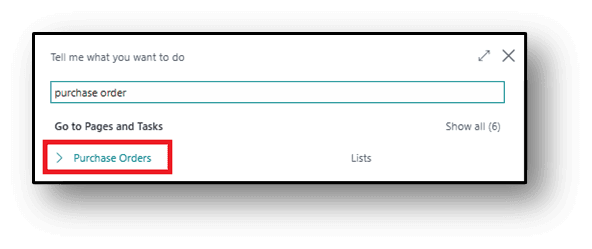
- On the Purchase Orders page, click New to create a new order.

- The order number will be auto generated based on number sequence.
- In the Vendor Name field, enter a vendor.
- In the Document Date field, enter the order date.
- Remaining maximum information will be auto calculated or will be fetched from vendor master data. Please review and change them as per your needs.

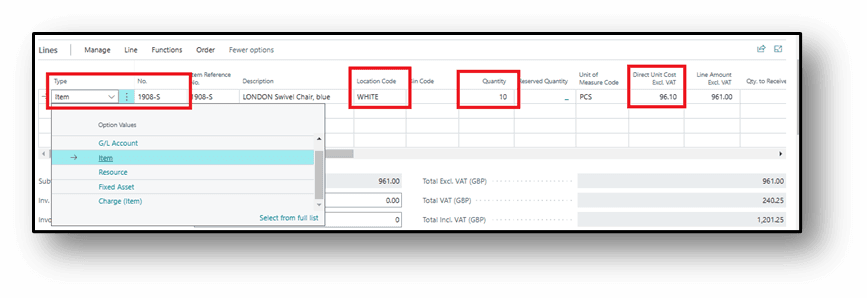
- Select the line type as an Item, GL Account, Fixed Asset or Charge (item).
- Select the required information into the No. filed.
- Enter the Location where to receive the items at the time of receiving.
- Enter the Quantity and UOM
- Enter the Direct Unit Cost.
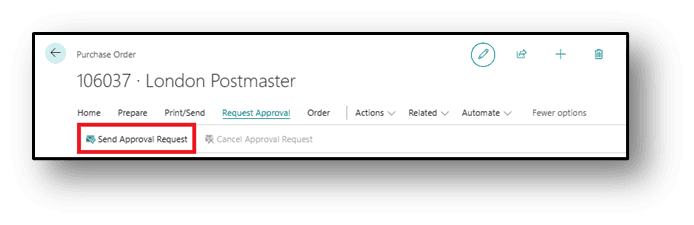
- Go to the Request Approval.
- Click on the Send Approval Request.
- After processing approval process (if applicable), please ensure that order is in the release state.
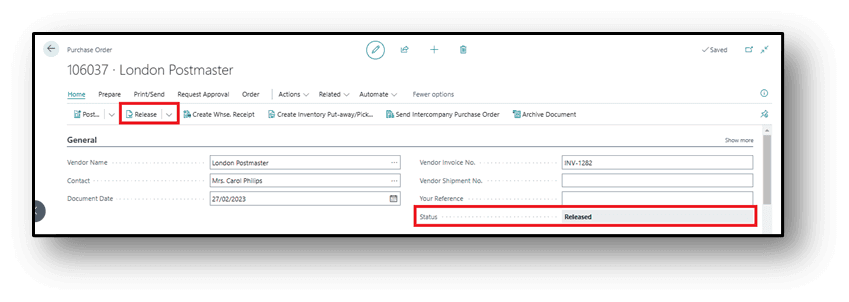
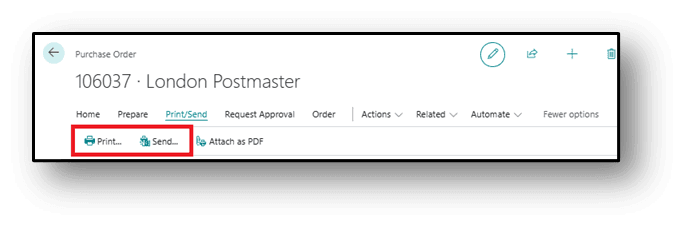
- On the Header click on Print/Send action from where choose the required option to print or send PO directly to vendor via email.
How to Create Warehouse Receiving
The purchase department creates the warehouse receipt for the warehouse user to receive the item according to the schedule receipt.
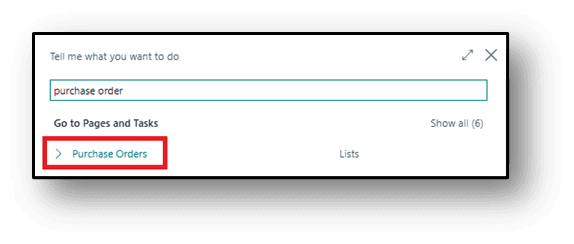
- Click the search button or Alt+Q on the application bar, enter Purchase Orders, and then choose the related link.
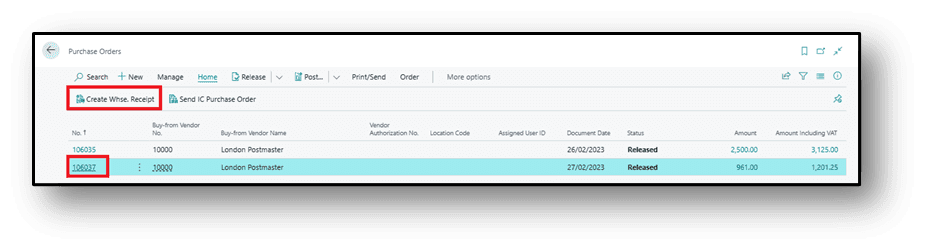
- On the Purchase Orders page, select the relevant PO from the list and click on Create Warehouse Receipt. Optionally, it can also be done by opening relevant document and clicking on Create Warehouse Receipt from the header.
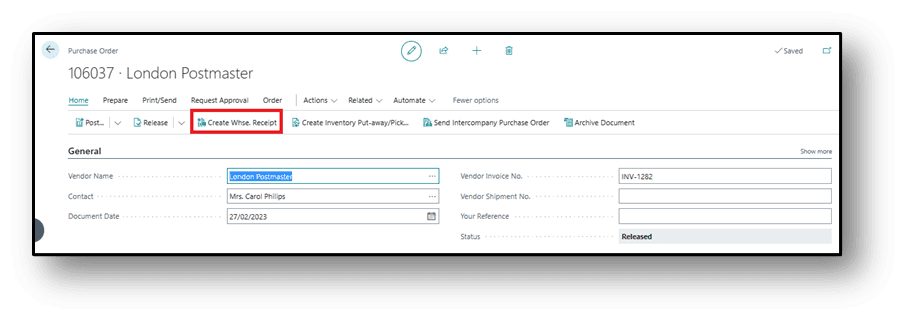
- Based on security permission, clicking Create Warehouse Receipt will open a new window which will display created warehouse receipt.
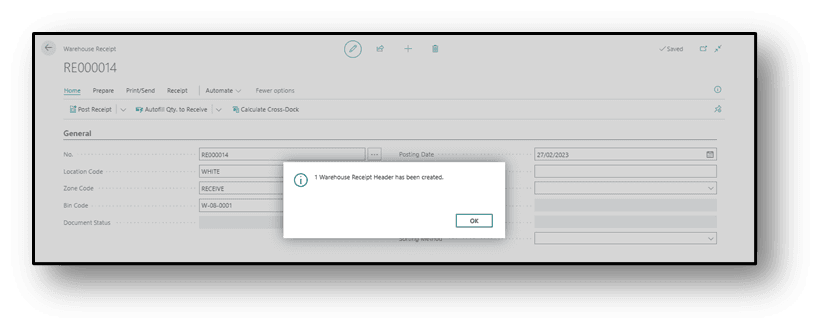
- This Warehouse Receipt will also appear to the warehouse department, from where warehouse team will follow the receiving process (described in separate warehouse related document).
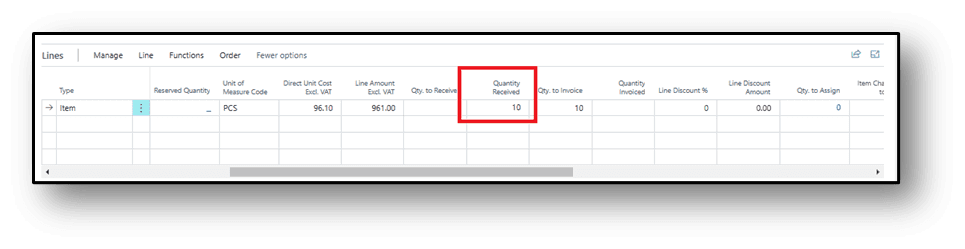
- Once the warehouse receipt is posted by the warehouse team, in the purchase order Quantity Received field it will be updated automatically.
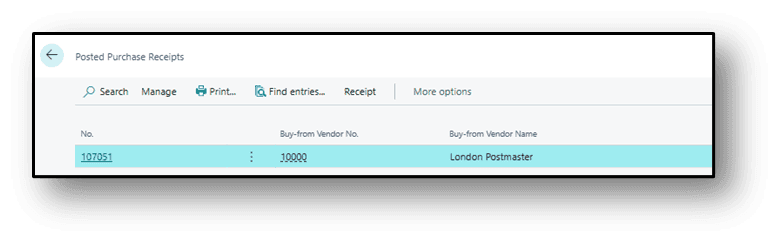
- To view the posted receipts, click Order then select Receipts.
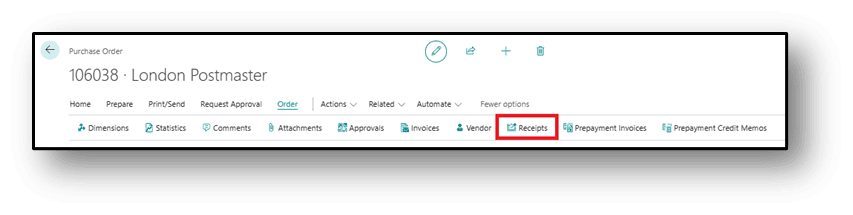
- While clicking on Receipts, system will give a list page containing all related receipts. Click on any receipt number to see its full detail, if required.
How to Create Purchase Invoices
Once the item is received in the warehouse, then the purchase invoice will be posted by the finance team.
- Click the search button or Alt+Q on the application bar, enter Purchase Invoice, and then choose the related link.
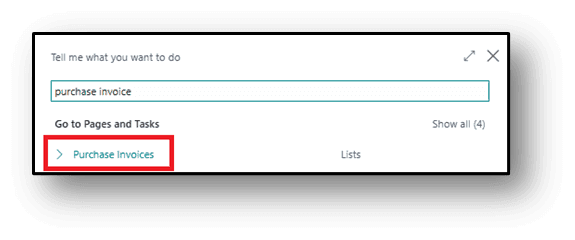
- Click on new to create a new purchase invoice.

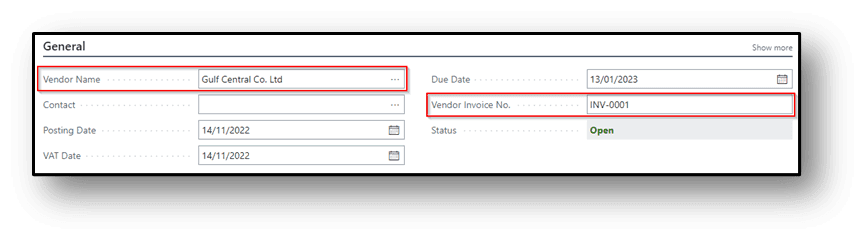
- On the header. Enter the vendor’s information and invoice number for which the invoice is prepared.
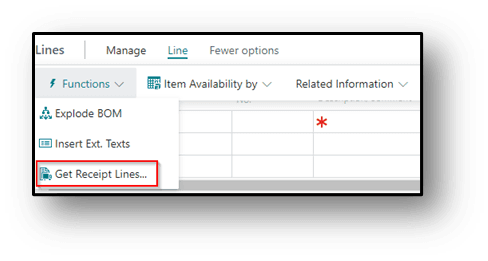
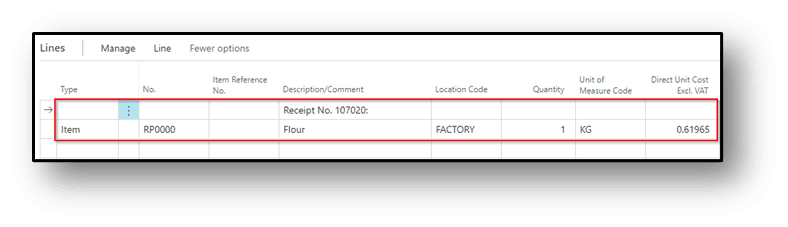
- Click on Line, Get Receipt Lines under Function action to select relevant Warehouse Receipt information and to enter it in the invoice lines.
- On Get Receipt Lines, select the receipt line according to the vendor you selected in the General Section.
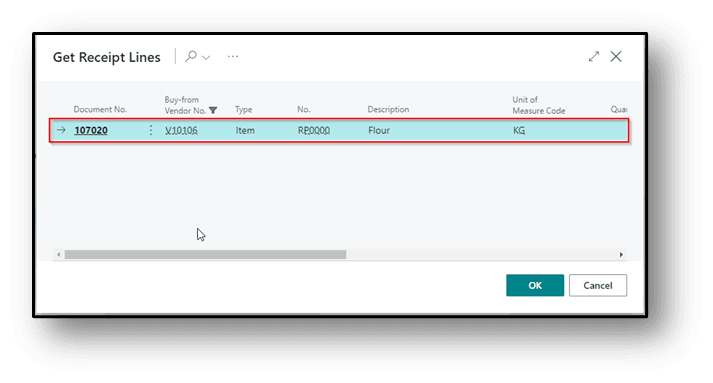
- After selecting, the above the line will appear in the Invoice.
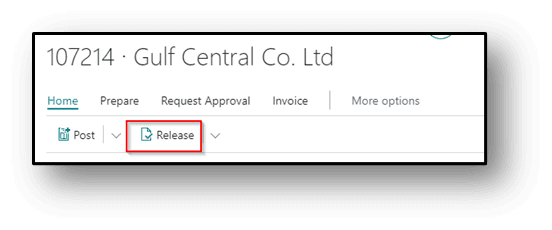
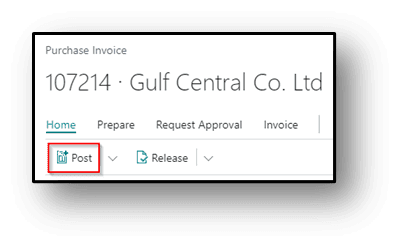
- Change the status of the Invoice to Release and then Post the invoice.
Open Posted Purchase Invoices
- To open Posted Purchase Invoices, search that.
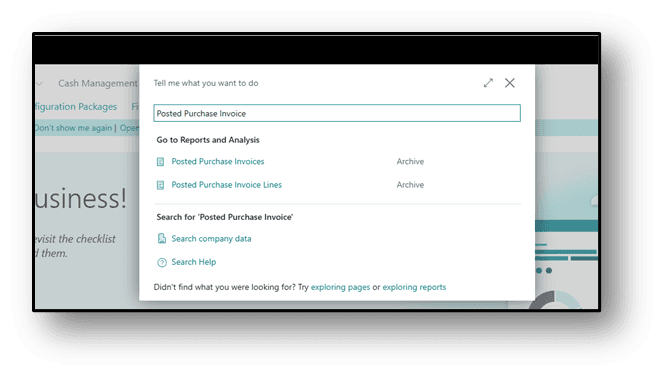
- And then you can see the Document.
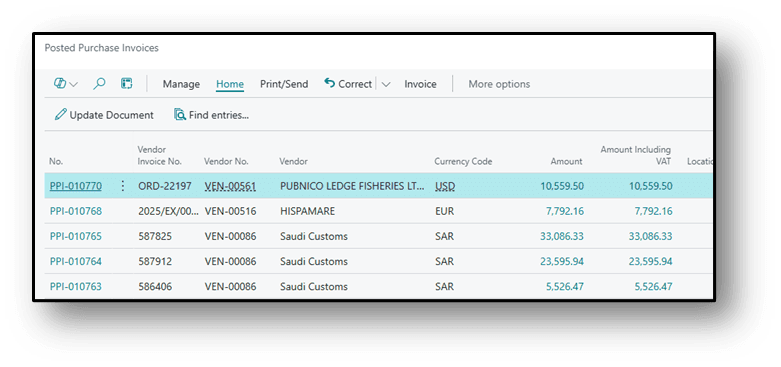
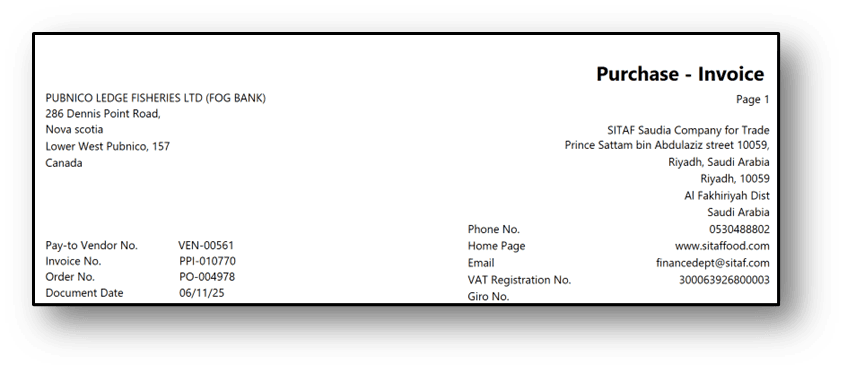
- Click on Print to see the Document.

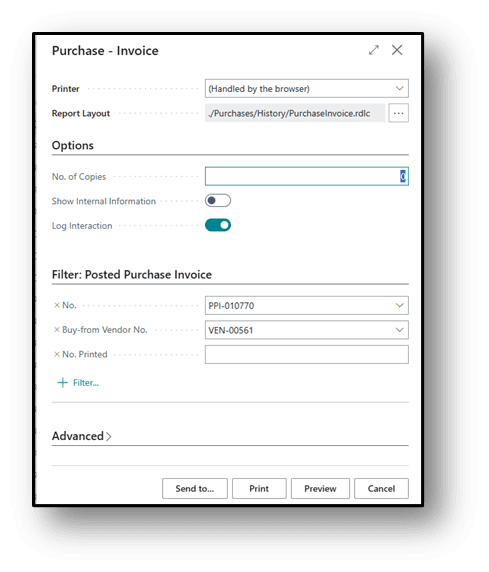
- Click on Preview.
Vendor Payment Journals
Finance teams create vendor payments. It could be full or partial payments. Vendor payments can be used to book for cash expenses where invoices are not created to book vendor payable balances. Cheque numbers can be generated through vendor payment.
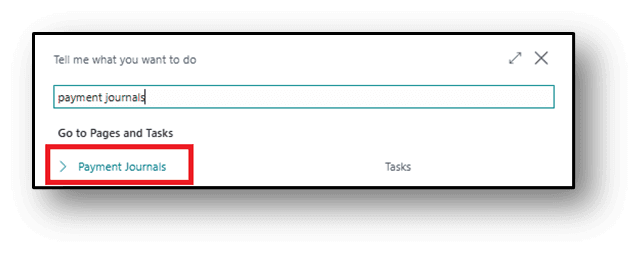
- Click the search button or Alt+Q on the application bar, enter Payment Journals, and then choose the related link.
- Enter the Document Number
- Select Vendor Account
- Select Payment Method
- Enter Payment Reference
- Enter Amount
- Enter Balancing Account Type (i.e. account from which payout to vendor)
- Balancing Account Number
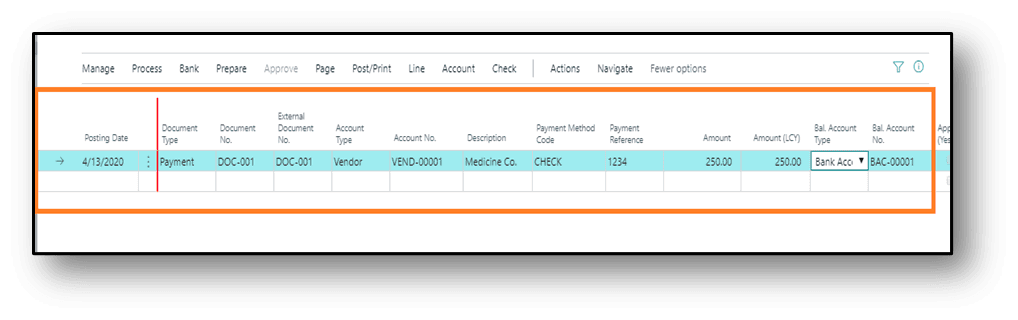
- Select Apply to Document Type
- Click on, ”…” three dots to open apply to Doc
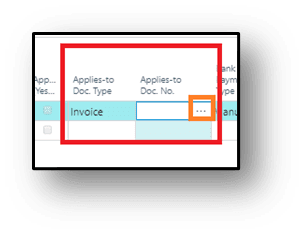
- A new window will open.

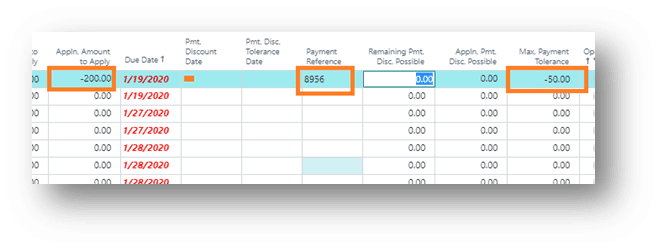
- Do the following to apply the payment amount to an invoice.
- In the apply to amount field, enter the applied amount.
- Enter the payment reference.
- Enter maximum tolerance amount (Cash Discount).
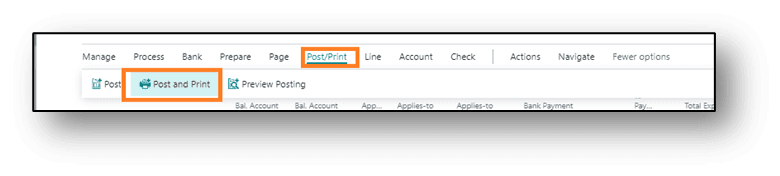
- Click on the post to post the document (if system generated check printing is required then following the steps mentioned below before posting).
Hope so, you have learned from this article.
Best Regards,
Ahmad Subhani
D365 Business Central Functional Consultant
Email ahmadsubhani424@gmail.com
WhatsApp +923357687164